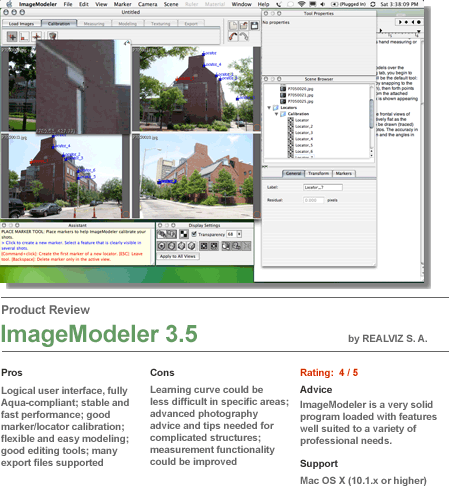
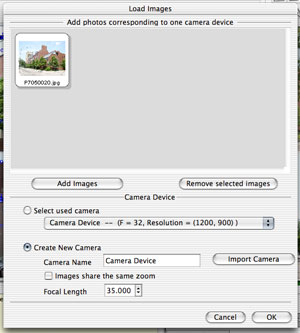
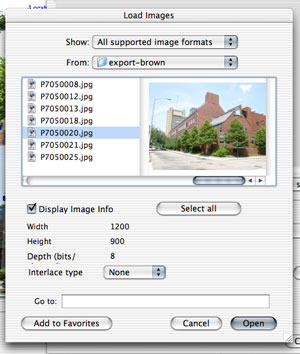
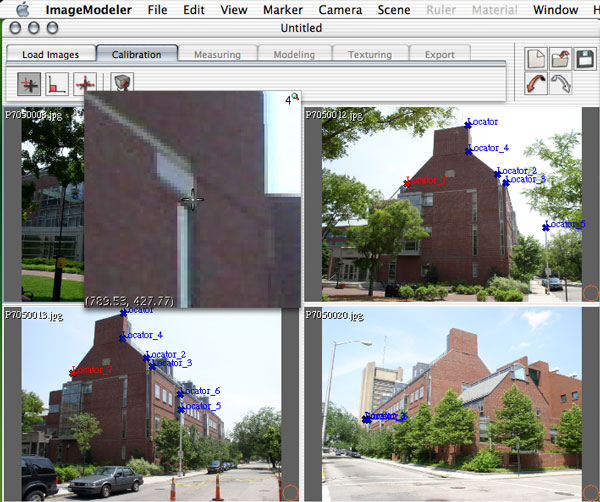
ImageModeler 3.5 is an application designed to create 3D models -- fully textured -- from a series of photographs. This type of technology is not new or unique to ImageModeler. Interstudio's DigiCAD is a similar application more focused on architectural photogrammetry than ImageModeler, but certainly this program is well built for that pursuit as well. ImageModeler for X ImageModeler is a fully native Mac OS X application. The interface is fully Aqua compliant and quite handsome in appearance. The main window features a tabbed interface over the display area (3D workspace area). This tab structure directly reflects the actual "workflow" for working in ImageModeler. You start your project by "loading images" (the first tab on the left). Then you move on to "calibration", "measurement", "modeling", "texturing" and eventually to "export". As you move through this workflow (tabs) under the tab bar area are tool buttons unique to the particular process you are in (eg: calibration). A Tools Properties dialog box sits on top of the Scene Browser (all to the right of the display area). Below the display area consists of Display Settings and the Assistant palette -- a palette which provides direction for using each tool. (see images 001 - 002) Because of the complexity of the calibration, measurement, and modeling of data -- all over photographic images -- ImageModeler provides a fully customizable colors preferences for all of the lines, markers and axis you will utilize in the display area. As a side note, we also advise that you do not use black & white photographs unless the subject is simple and of definite contrasting values. Color simply helps in the placement of markers during calibration. ImageModeler is not an easy application to learn. It is not as easy to figure out as say an Apple iApp like iMovie or iPhoto, yet it is somewhere between there and an application like Final Cut Pro or formZ. Having the Assistant Palette was a godsend in a number of "not-so-obvious" situations. Even then, occasionally the application was difficult to figure out. A specific instance of this is setting the "world space" axis using the program's tools to do this. Overall the application has a reasonable learning curve, but if you buy the program for a photogrammetry or modeling project of a complex shape, plan on giving yourself a few weeks to master the program and work out "trial-and-errors" in your project photography. The Essentials: Mastering the Photography Part When working with the program we learned the hard way that you must take the correct photographs in order for calibration to have a chance at being successful. Because trees often block the views of buildings, they can also block the view of specific "ideal" locations on the building for the placement of markers (more on that in a minute). ImageModeler's documentation discusses this subject, but its own tutorial of a simple building with aerial photography misrepresents the true difficulty of photographing a more complicated building in preparation for ImageModeler work. The Process Once you have taken good pictures the process of bringing them into ImageModeler is very straight forward. You have the ability to load images and to specify the camera's technical characteristics (focal length for instance) (see images 003-004) If you have to shoot a building with different lens (say a 24mm wide angle and a 50mm lens) you can specify which images are shot with which lens. This helps the calibration process. When your images are loaded you spend time locating "markers" on the images. These markers are called "locators". It is best to place each marker (1-n) in every photograph if possible but many times that will not be possible. In that case place markers in at least three images if possible. We are not sure how meaningful it is to place a marker in just two images. In our most complex building undertaken, we placed over 20 markers (see images 001-002). This process can take some time. Placing markers is actually kind of fun. Using the Place Marker tool you click on an image and a small zoom window appears under the cursor point, enabling you to place the marker accurately down to the pixel. (See image 005). It takes some thoughtfulness to decide which points to place markers at, for you will use these markers turned 3D locators as snap points for modeling later. Hence, the trial-and-error of the process will inform your photography skills for the next ImageModeler project you undertake. As you place your 2D markers they become 3D locators in the 3D display model space. At a certain point ImageModeler will have enough markers/locators to automatically calibrate the scene. When this happens it becomes optional to place further markers but you will likely do so for modeling purposes. Again, as you will see, you use locator points for snapping guides when you do your modeling work. Next Page: Modeling, Texturing and More | 1 | 2 | 
|