|
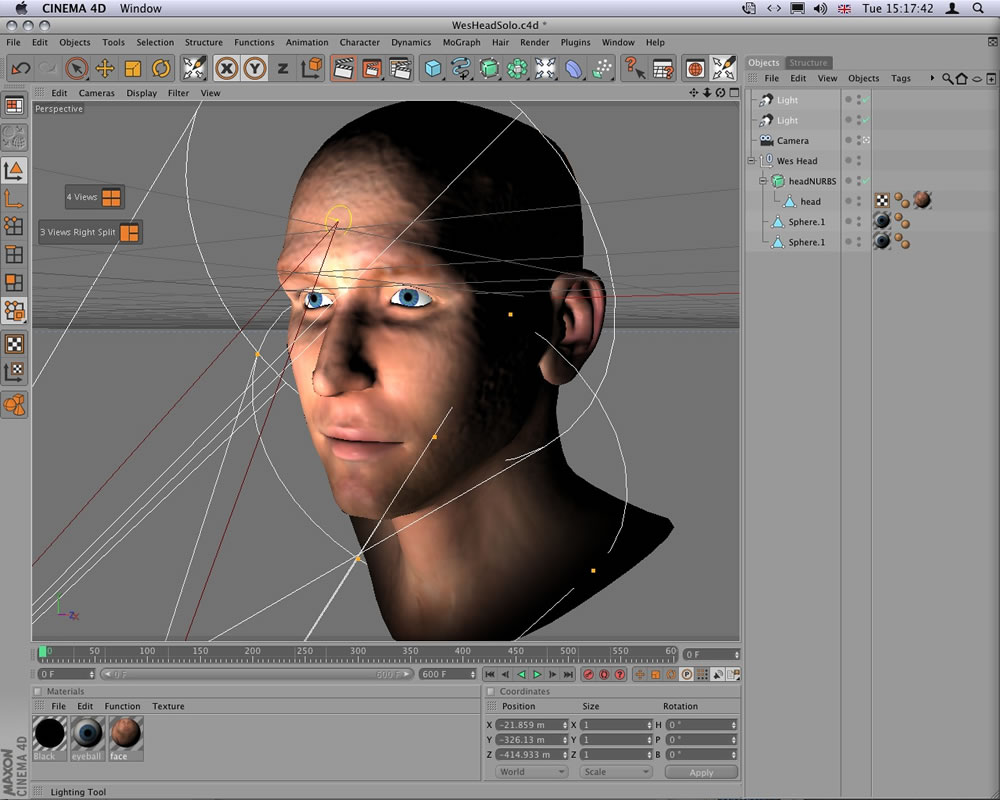
Lighting Tool
Another feature of 10.5 that straddles the
boundary between interface and feature is the Lighting tool.
This is basically a new way of setting and aiming lights,
and aims to make the process more "on-the-fly".
We could mention here that the inherent clunkiness of the
previous system was brought about by C4D's use of
separate Move, Scale & Rotate tools, rather than the
all-in-one 'Gizmos' favored by other programs.
As well as placement, the light's other attributes
such as brightness or cone angle for spotlights, for example,
can be set interactively in the Editor window (the 3D workspace)
without ever going into the Attributes manager. (see
QuickTimes QT1 - QT3)
|
|
|
|
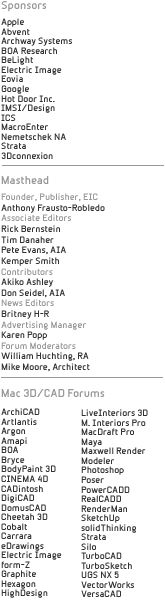
QT1
- Lighting Tool Part 1 - QuickTime Movie. Shows placement
of lighting tool. (click on image to open QuickTime
movie).
|
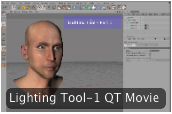
QT2
- Lighting Tool Part 2 - QuickTime Movie. Adding
second light, modifying lights in the attributes
palettes, et cetera.
|
This is all
done by the use of various key combinations in conjunction
with the Lighting tool -- Shift varies the distance
from a surface along a normal, and holding Alt will swap
into target mode for spotlights. The various key combinations
can be a little troublesome at first, but once learned,
the set-up of lights becomes remarkably fluid. A nice touch
is
that multiple-selected lights will all have their attributes
changed in concert. One slight hiccup was that when altering
the light intensity, the numerical value in the Attributes
manager didn't update until after the mouse button
was released -- some feedback here would be nice, and
we're sure this minor oversight will be fixed soon.
|
|
|
|
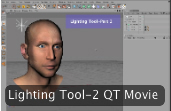
QT3
- Lighting Tool Part 3 - QuickTime Movie. Shows the
effect of Lighting with the Enhanced OpenGL features
|
|
|
|
|
|
01.1
- The Standard OpenGL view. Note the ragged shadow
edges.
|
01.2
- Enhanced OpenGL adds several features: Bump mapping
(seen here in the skin), better shadow terminators
(no more ragged edges) and a far-more accurate rendition
of the effects of lights in the scene
|
XRefs Brand new in 10.5 -- and a much-requested
feature -- are External References (XRefs). These are external
files that can be 'embedded' in a master scene
via the new XRef object. This has obvious advantages working
in a collaborative environment, where one person is responsible
for the animation in a scene, and other artists are concentrating
on modeling and texturing. Should decisions be taken and
changes made somewhere else down the pipeline, the referenced
objects can be changed and the changes passed down to the
Master file without the person responsible for the master
file batting an eyelid. The user of the Master file can,
however, change materials and assign materials to an XRef,
as well as applying any deformers, HyperNURBS (Subdivision)
objects or Clone Array objects.
What can't be altered
is the actual geometry of the XRefed object itself -- unless
you first use the Make Editable or Current State to Object
command, which then breaks the XRef link. The XRef now neatly
circumvents the previous method, which was to fall back on
the 'Merge...' command -- an often time-consuming
chore. This distributed method of working is also the standard
in large Special Effects houses, so should help Cinema 4D
to more closely integrate with those companies' production
workflows.(see QuickTime QT4)
|
|
|
|
QT4
- XRef system in Cinema 4D is new in version 10.5,
more aligning the application to better suit the
production pipelines in large special-effects houses.
|
|
New Timeline
The Timeline has seen a thorough re-working
in version 10.5. First thing to note is that the Timeline
and the Layers function are linked: turn off a layer's visibility,
and those objects in the layer will disappear from the Timeline.
This is, of course, useful for isolating elements and concentrating
on them -- the Timeline could get populated with tracks
and keys very quickly. The Timeline is, in fact, now two
Timelines: Normal and Advanced.
The Advanced mode
allows you to split keys -- into separate Position,
Rotation and Scale or Heading, Pitch and Bank, for example,
without 'opening up' tracks. There's also
a much-needed ability to scale the Mini f-curves vertically.
Mini f-curves can be shown and revealed in the Track Editor,
obviating the need to switch to a specific f-curve view.
The vertical scaling is a real boon to seeing exactly what's
going on -- before, a lot of the information got compressed
in the vertical scale.
There's
also a new Clean Tracks command that helps to keep everything,
well, clean. The purpose of
this is to remove redundant keys -- for instances where
a value may not be changing in one channel, whilst varying
in others. The redundant keys are stripped out leaving only
start and end keys, greatly reducing clutter in the Timeline.
In a similar vein are Reduced Modification curves. These
are used when editing an f-curve which can get overly complex
(like in imported Motion Capture data, where there are keys
on
every frame). The RM curve is a simplified 'overlay'
on the actual f-curve, allowing the user to change the basic
shape of the curve, without resorting to laborious dragging
of multiple keys in multiple channels.
One thing that may dismay seasoned users is
that Sequences (Cinema 4D's non-linear animation implementation)
are gone. Well, not gone entirely, rather their functionality
has been rolled into those of the standard Tracks. Anything
that you could do before with a Sequence you can now do with
a Track.
MOCCA
A large part of the toolset in Cinema 4D is
aimed at character animation, and 10.5 has added an array
of tools to make the character animator's life easier.
Some of these are available only in the MOCCA add-on module,
whilst others are available in the core program. First of
these is the Squash & Stretch deformer. This is a technique
used to give 'life' to characters and objects
by over-exaggerating everyday deformations (a ball bouncing
is the most obvious example). The S&S module is applied
as a tag to an object and the Attributes editor can then
be used to alter the characteristics. The results are nothing
that you can't achieve with other techniques, but the
S&S tag makes it a whole lot faster & easier. Similarly,
the Jiggle deformer gives random shaking motions to meshes--
a lot more useful that it first sounds. Then there's
the Cluster deformer -- this allows you to take a set
of points (via a selection set) and link them to the motion
of a Null object. The Null is then used as a 'handle'
to animate the points: a series of nulls bound to a divided
plane could be used to simulate Wave motion, for example.
The preceding features are available in the
MOCCA module. The core application has also had this area
addressed with
a new option on the IK tag: IK joint systems now have the
ability to squash and stretch -- essentially changing
the distance between the joints in an IK chain. You can also
set the behavior of the bound mesh to vary with the stretching:
the mesh can increase in volume (maintaining overall proportions)
or the mesh volume can remain constant, resulting in 'emaciation'
as the bone chain stretches.
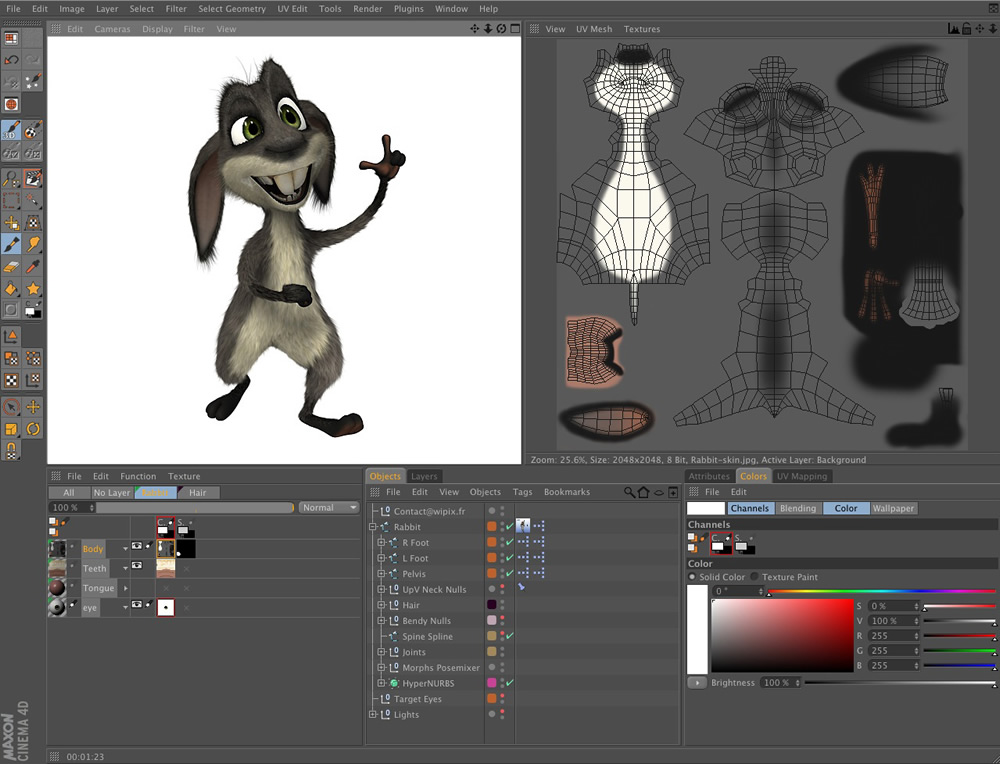
BodyPaint
As mentioned previously, BodyPaint is now rolled
into the main application. This is a complete environment
for painting and UV mapping characters. It allows you to
paint directly onto the model's mesh and the results
update in real time in the Editor Window. (see
image 02) You'll need a pressure-sensitive
graphics tablet for best results, and
there can be a lag with painting and updating, when using
complex, layered textures, but with newer Intel processors
this is becoming less of a worry. Coupled with the new Advanced
OpenGL mode, this allows not only painting of Color texture
to be previewed in real time, but also Bump, Noise and Specular
channels. (see image 02)
|
|
|
|
02
- The BodyPaint 3D painting interface is now rolled
into the base application package. It provides a
full environment for UV mapping and texturing characters,
and allows paint to be applied in real-time to a
character’s mesh.
|
|
next
page > | 1 | 2 | 3 |
|